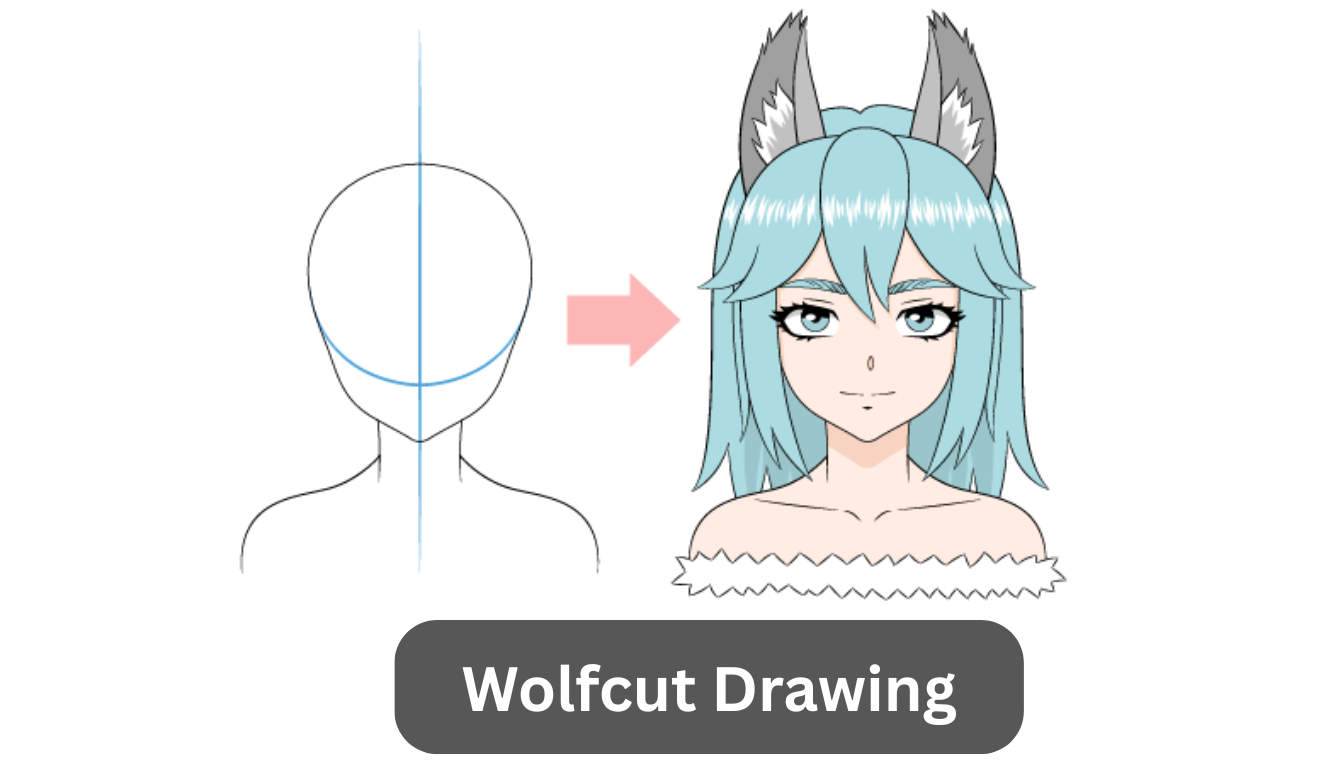
The art of wolfcut drawing has become an essential skill for hairstylists, fashion illustrators, and beauty enthusiasts who want to master one of today’s most popular hairstyles. Whether you’re a professional stylist looking to communicate your vision to clients or an aspiring artist wanting to capture this edgy style on paper, understanding the fundamentals of wolfcut drawing can elevate your creative work to new levels.
Understanding the Wolfcut Structure
Before diving into the technical aspects of wolfcut drawing, it’s important to understand what makes this hairstyle unique. The wolfcut combines elements of the classic shag and mullet, featuring heavy layers throughout with shorter pieces on top that gradually blend into longer lengths at the back. This creates a wild, untamed appearance that has captured the attention of fashion-forward individuals worldwide.
When approaching wolfcut drawing, think of the hairstyle as having distinct sections. The crown area features choppy, textured layers that add volume and movement. The mid-section shows a dramatic transition where lengths vary significantly, creating the signature shaggy appearance. The bottom section maintains longer strands that frame the face and cascade down the back, providing that essential contrast that defines the style.
Essential Tools and Techniques
Starting your wolfcut drawing journey requires minimal but effective tools. A quality sketchbook, pencils ranging from 2H to 6B, and an eraser form your basic toolkit. Many artists also incorporate fine-tip pens for detailed line work and blending stumps to create smooth transitions between light and shadow.
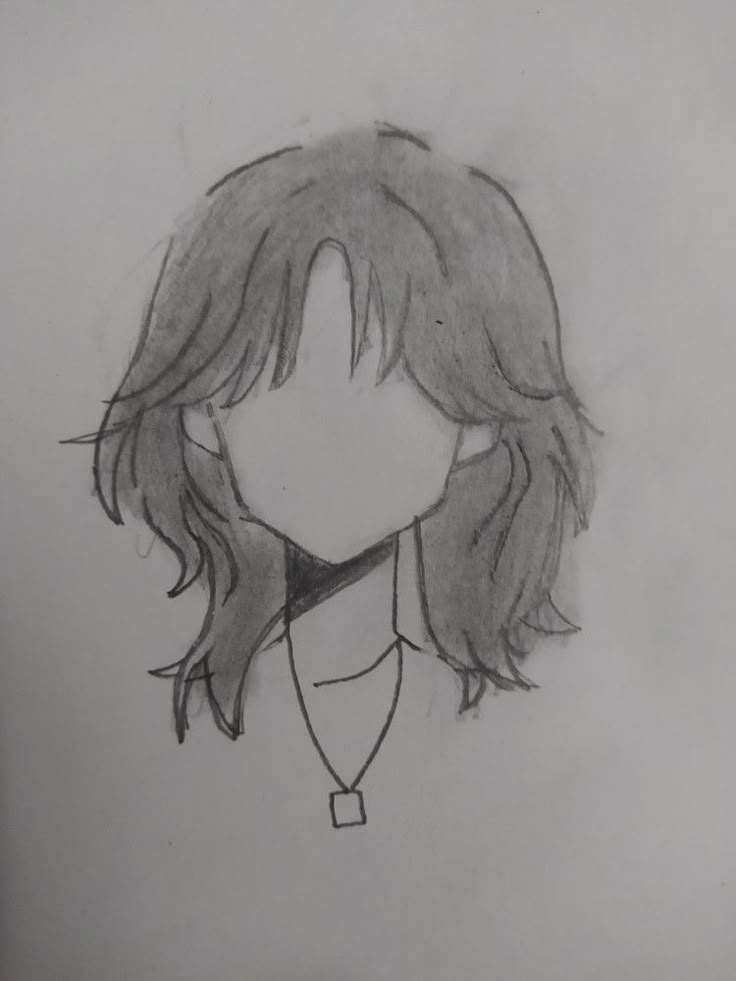
The key to successful wolfcut drawing lies in capturing movement and texture. Unlike straight, blunt hairstyles that can be drawn with clean, simple lines, the wolfcut demands a more dynamic approach. Use quick, confident strokes to represent individual hair strands and layers. Varying your pencil pressure creates depth, with lighter touches suggesting wispy ends and heavier pressure defining the denser sections near the roots.
Building Your Foundation
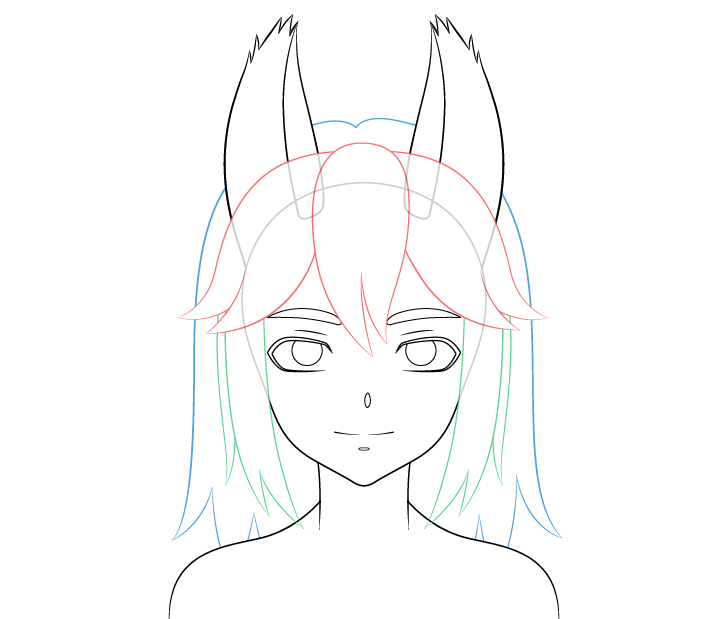
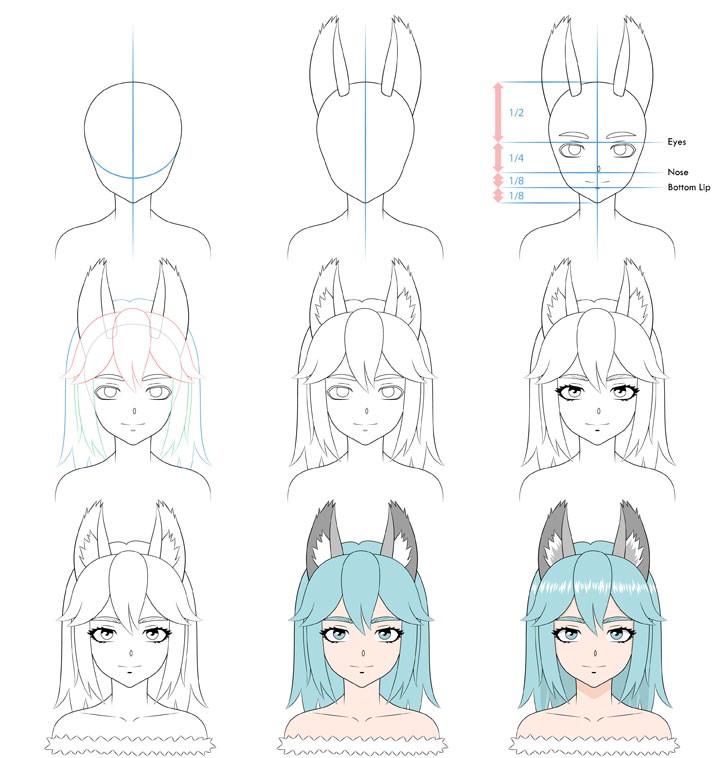
Begin your wolfcut drawing by sketching the basic head shape and facial features. This provides context and helps you visualize how the hair will fall naturally around the face. Mark key reference points where major layers will sit—typically at the cheekbones, jawline, and shoulders for medium-length versions.
Next, outline the general silhouette of the wolfcut. Draw flowing lines that capture the overall shape, paying attention to volume at the crown and the way layers fan out from the center. Remember that the wolfcut isn’t symmetrical; embrace asymmetry and imperfection as they contribute to the style’s rebellious character.
Mastering Layers and Texture
The layering technique in wolfcut drawing separates amateur attempts from professional-looking illustrations. Start by establishing your longest layers, which typically fall around shoulder length or slightly below. These serve as anchor points for the entire drawing.
Work your way up, adding progressively shorter layers. Each layer should have a slightly different texture and direction. Use varying line weights to create dimension—thicker lines at the roots where hair is denser, transitioning to lighter, more delicate lines at the ends. This variation tricks the eye into perceiving depth and movement.
For enhanced realism in your wolfcut drawing, incorporate directional hair flow. Hair doesn’t simply hang straight down; it curves, twists, and responds to gravity and movement. Show some strands falling forward around the face, others sweeping back, and a few rebellious pieces standing out at odd angles. This natural chaos is what gives the wolfcut its distinctive personality.
Adding Dimension Through Shading
Shading transforms a flat wolfcut drawing into a three-dimensional representation. Identify your light source first—this determines where highlights and shadows fall. The crown area, being higher, typically catches more light, while the underside of layers creates natural shadows.
Use cross-hatching or gradual shading techniques to build up darker values. The spaces between layers offer opportunities for deep shadows that emphasize separation and depth. Don’t forget to leave areas of white paper showing through to represent highlights on individual strands catching the light.
Pay special attention to how layers overlap in your wolfcut drawing. Each layer casts subtle shadows on the hair beneath it. These shadows help viewers understand the three-dimensional structure of the hairstyle and make your drawing more convincing.
Capturing Different Hair Textures
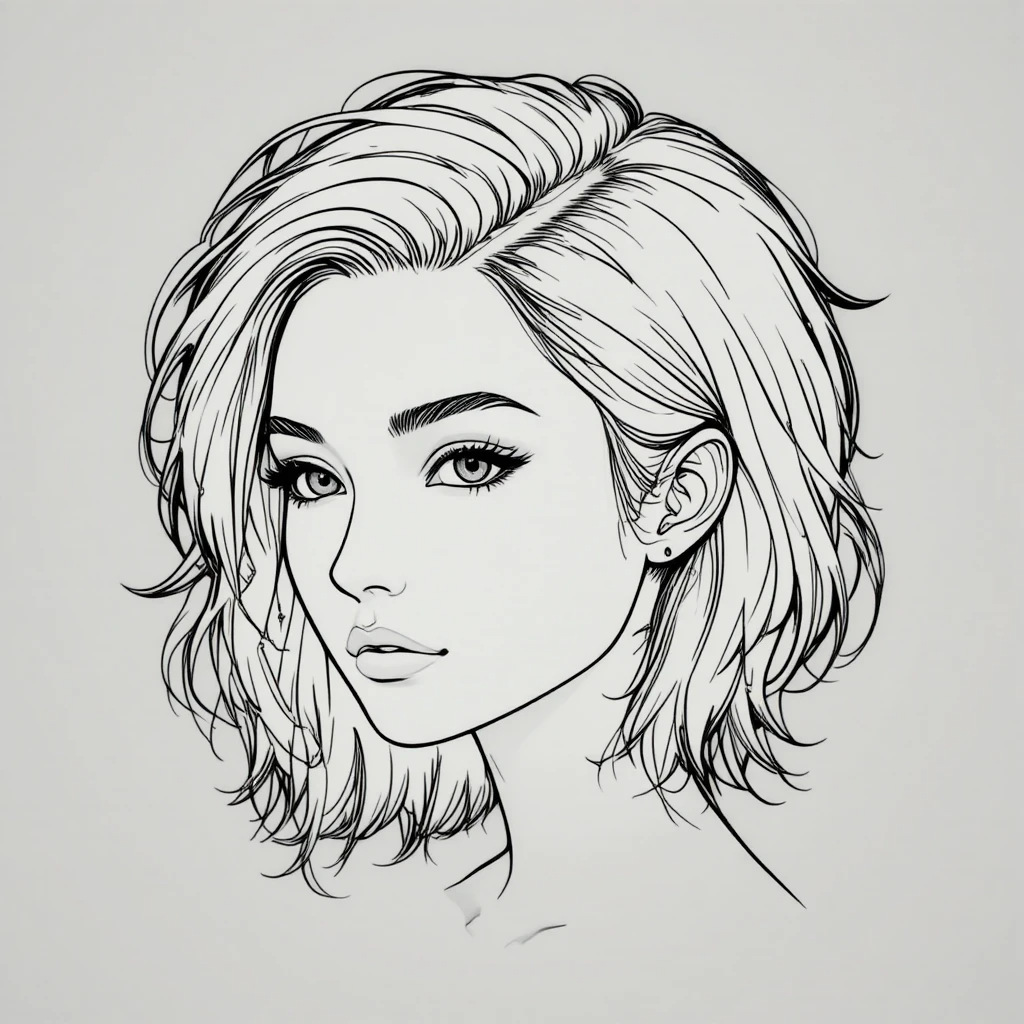
One of the beautiful aspects of wolfcut drawing is adapting the style to various hair textures. Straight hair requires clean, flowing lines with minimal waviness. Draw strands that hang more uniformly but still maintain that choppy, layered appearance characteristic of the cut.
For wavy hair, incorporate gentle S-curves throughout your drawing. Waves add natural volume and movement, making the wolfcut appear even more dynamic. Vary the intensity of waves—some sections might be looser while others show tighter curls, especially around the face-framing layers.
Curly-haired wolfcut drawing presents unique challenges and opportunities. Use spiraling lines to represent curls, keeping in mind that curly hair typically has more volume and spring. The layers in a curly wolfcut create a halo effect, with shorter pieces bouncing up and creating an impressive silhouette.
Incorporating Face-Framing Elements
The face-framing layers are crucial elements in any wolfcut drawing. These shorter pieces typically start around cheekbone or chin level and add softness to the overall edgy look. Draw these layers with particular attention to how they curve around the face, following the natural contours of the cheeks and jawline.
Bangs, when included, should blend seamlessly with the rest of the cut. Whether you’re drawing wispy, curtain-style bangs or choppier straight-across fringe, ensure they maintain the textured, lived-in quality that defines the wolfcut aesthetic.
Adding Final Details and Refinements
Once your basic wolfcut drawing is complete, step back and assess the overall composition. Look for areas that need more definition or additional texture. Add flyaway hairs around the perimeter to enhance the natural, undone appearance. These small details make the difference between a good drawing and a great one.
Consider adding environmental elements that interact with the hair. A slight breeze effect, with strands floating away from the main mass, adds drama and life to your wolfcut drawing. Movement suggestions help viewers imagine the hair in motion, making your illustration more engaging.
Practical Applications
The skills you develop through wolfcut drawing extend beyond artistic expression. Hairstylists use these drawings to communicate ideas with clients before making the first cut. Having a visual reference helps ensure both parties share the same vision, reducing miscommunication and improving client satisfaction.
Fashion illustrators incorporate wolfcut drawings into their character designs, as the hairstyle immediately conveys a certain attitude and aesthetic. Beauty bloggers and content creators use these illustrations for educational content, showing followers how the cut can be adapted to different face shapes and personal styles.
Frequently Asked Questions
What is a wolfcut drawing and why is it important for hairstylists?
A wolfcut drawing is an artistic representation of the popular layered hairstyle that combines shag and mullet elements. Hairstylists use these drawings to communicate their vision with clients before cutting, ensuring both parties understand the desired outcome. It serves as a visual reference that reduces miscommunication and helps clients visualize how the finished style will look on them.
What are the basic tools needed to create a wolfcut drawing?
You need a quality sketchbook, pencils ranging from 2H to 6B for different line weights, and a good eraser for corrections. Fine-tip pens help with detailed line work while blending stumps create smooth transitions between light and shadow. These basic tools provide everything necessary to capture the texture and movement characteristic of the wolfcut style.
How do you capture the layered texture in a wolfcut drawing?
Use quick, confident strokes with varying pencil pressure to represent individual hair strands and create depth throughout the drawing. Start with the longest layers as anchor points and work upward, adding progressively shorter layers with different textures and directions. Incorporate directional flow showing strands falling in multiple directions to achieve the natural, untamed appearance that defines the wolfcut.
What’s the difference between drawing straight and curly wolfcuts?
Straight hair wolfcut drawings require clean, flowing lines with minimal waviness while maintaining the choppy, layered structure. Curly wolfcut drawings use spiraling lines to represent curls and typically show more volume with a halo effect. Curly versions have shorter pieces that bounce up naturally, creating a more dramatic silhouette compared to the sleeker straight-hair version.
How do you add dimension and depth to a wolfcut drawing?
Identify your light source first, then use shading techniques like cross-hatching or gradual shading to build darker values in shadowed areas. Add shadows in spaces between layers and where layers overlap to emphasize separation and three-dimensional structure. Leave areas of white paper showing through to represent highlights on strands catching light, particularly on the crown area.
What makes face-framing layers important in wolfcut drawings?
Face-framing layers add softness to the edgy overall look and typically start around cheekbone or chin level in the drawing. These shorter pieces should curve naturally around facial contours, following the shape of cheeks and jawline for a flattering effect. They’re crucial for capturing the complete wolfcut aesthetic and showing how the style interacts with the wearer’s face.
How can beginners practice improving their wolfcut drawing skills?
Study reference photos from multiple angles including profile, three-quarter view, and back view to understand the three-dimensional layer structure. Practice drawing the same cut repeatedly on different head positions to build comprehensive understanding of how layers interact. Start with simple pencil sketches before experimenting with other mediums like digital tools, charcoal, or ink.
What common mistakes should be avoided in wolfcut drawing?
Avoid making the layers too uniform or symmetrical, as the wolfcut’s appeal lies in its natural, imperfect appearance. Don’t forget to vary line weights throughout the drawing, as using only one thickness creates flat, unconvincing results. Never skip the shading process, as dimension and depth are essential for transforming a basic outline into a realistic representation.
How do you show movement in a wolfcut drawing?
Add flyaway hairs around the perimeter and draw some strands floating away from the main mass to suggest wind or natural motion. Use directional lines that show hair flowing in various directions rather than all hanging straight down. Include wispy ends and a few rebellious pieces standing at odd angles to capture the dynamic, lived-in quality of the style.
Can wolfcut drawings be used for client consultations?
Yes, wolfcut drawings are excellent consultation tools that help hairstylists visually communicate their cutting plan before touching the client’s hair. They allow clients to see how different layer lengths, face-framing pieces, and overall shape will look on them. This visual reference builds trust, manages expectations, and ensures both stylist and client are aligned on the desired outcome.
Conclusion
Mastering the art of wolfcut drawing opens doors to creative expression and professional communication in the beauty industry. This versatile skill allows hairstylists to visualize and share their cutting plans with clients, while artists and illustrators can capture one of the most dynamic and popular hairstyles of our time. Through understanding the fundamental structure of layers, practicing shading techniques, and learning to represent different hair textures, anyone can develop the ability to create compelling wolfcut illustrations.
The journey from basic sketches to detailed, professional-quality wolfcut drawing requires patience, practice, and careful observation of how hair naturally falls and moves. By focusing on key elements like directional flow, varied line weights, strategic shading, and those signature face-framing layers, your illustrations will capture the wild, untamed spirit that makes this hairstyle so captivating. Remember that imperfection is part of the wolfcut’s charm—embrace asymmetry and natural movement in your drawings.